
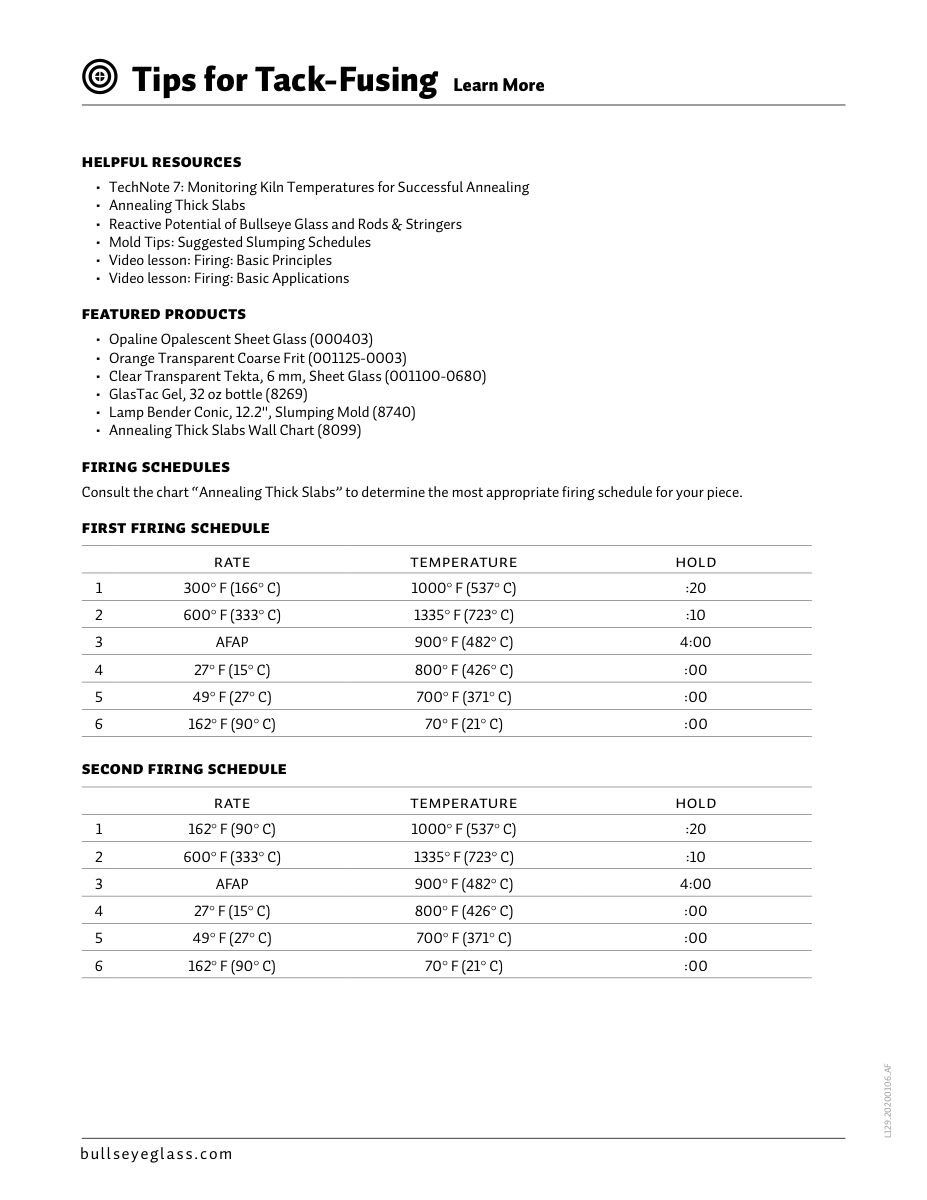
A tack fuse is the kilnforming result to choose when you want glass pieces to bond without disappearing into one flat surface. Texture remains visible. Edges soften, but they do not fully level. Raised details, stringers, dots, strips, and layered shapes can keep their identity.
That makes tack fusing especially useful for work that depends on relief: small components, decorative panels, textured tiles, jewelry elements, landscapes, mosaics, and pieces where the hand-built surface is part of the design. The schedule is asking the glass to join, not to melt into a smooth blank.
The challenge is balance. Too little heatwork and pieces may not bond securely. Too much heatwork and the design can slide toward contour or full fuse. Understanding that middle ground helps you read a tack-fuse schedule with more confidence.
01 / The desired result
Tack fuse preserves relief while bonding the glass.
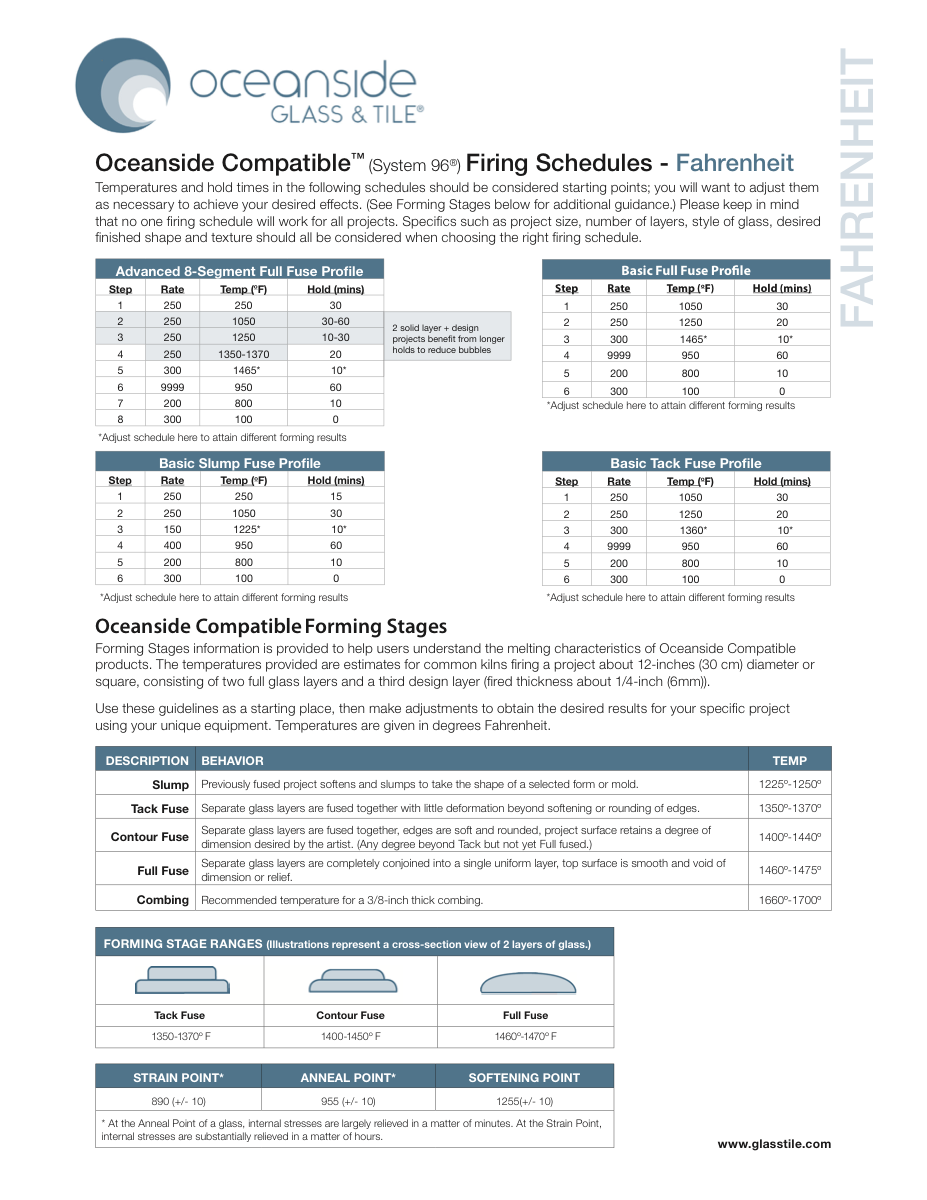
In a tack fuse, compatible glass pieces are heated until they soften enough to attach to each other, but not so far that all edges round deeply or the surface becomes smooth. The finished piece should still show layers, raised shapes, and a sense of construction.
The exact amount of tack can vary. A light tack may leave crisp edges and strong relief. A stronger tack may soften points, round corners, and make the surface feel more unified while still keeping visible texture. Both can be useful if they match the design intent.
This is why “tack fuse” is better understood as a range than a single number. The right result depends on glass thickness, element size, kiln behavior, shelf position, target temperature, hold time, and how much contact the pieces have with each other.
Before firing, decide what you want to preserve. Are the raised dots supposed to stay proud? Should stringers remain visible? Should sharp corners soften just a little? Naming the desired surface makes the schedule easier to judge.
Tack fuse is a controlled bond: attached enough to hold, textured enough to read as built.
02 / Bonding and contact
The schedule can only bond what the layout allows.
Tack fusing depends on contact. A tiny point of contact, a tilted element, or a piece resting on uneven texture may not bond the same way as a flat piece sitting securely on a base layer. The schedule delivers heat, but the physical layout determines where glass can actually join.
This is one reason tack-fused work benefits from careful assembly. Clean glass, stable placement, and thoughtful contact areas make the result more reliable. If a raised element is important structurally, make sure it has enough contact to bond safely at the amount of heatwork you plan to use.
Small details may tack quickly. Larger or thicker elements may need more heatwork to bond well. Mixed thicknesses can make the decision harder because the schedule must protect the whole piece while still giving heavier areas enough time to respond.
If pieces fall off or feel weak after firing, do not only raise the peak temperature. Ask whether the contact area was large enough, whether the element was stable, whether the hold was long enough, and whether a slightly stronger tack would still preserve the look you want.
A tack-fuse schedule cannot replace good contact between the pieces being joined.
03 / Texture versus heatwork
The more heatwork you add, the more texture softens.
Texture is controlled by total heatwork: temperature, time, rate, kiln behavior, and the mass of the piece together. A few extra minutes at forming temperature can noticeably round edges or soften surface relief.
This is where tack fuse differs from full fuse. In a full fuse, the schedule intentionally delivers enough heatwork for a smoother, more unified surface. In tack fuse, the schedule stops earlier so the design keeps more dimension.
There is no universal perfect tack-fuse target. A small jewelry kiln, a large studio kiln, a top shelf, a bottom shelf, and a heavily loaded firing may all produce different degrees of softening from the same written schedule.
The best studio habit is to record the visual result in plain language: “too sharp,” “light tack,” “good bond with texture,” “edges over-rounded,” or “almost contour fuse.” Those words make the next adjustment clearer than numbers alone.
If the surface lost too much relief, inspect total heatwork before blaming one temperature.
04 / Bubbles and shadows
Raised designs create their own air paths and traps.
Tack-fused work often uses raised shapes, stringers, frit, dots, strips, and uneven surfaces. Those details can create air spaces, little shadows, and places where heat reaches the glass unevenly. Some of that texture is desirable; some can become a bubble or weak spot.
A bubble squeeze may matter less for a small open tack-fuse design than for a large full-fuse stack, but air still needs somewhere to go. Wide flat pieces placed over a base can trap air if the surface begins to seal before the air escapes.
Construction is the first tool. Avoid layouts that create sealed pockets unless that effect is intentional. Think about how air might move out as the glass softens. Powder, frit, and inclusions can add beauty, but they also change how the surface behaves.
If bubbles appear, look at their location. Bubbles under large pieces suggest different changes than bubbles around frit or raised lines. Adjust the layup and the schedule together rather than assuming one generic bubble fix will solve every design.
Texture is part of tack fuse, but trapped air still needs a route out.
05 / Annealing textured work
A raised surface still needs a safe cool.
A tack-fused piece may look less melted than a full-fused blank, but it still needs proper annealing and cooling. Raised elements, uneven thickness, and mixed masses can make stress relief more important, not less.
Annealing is about internal stability, not surface smoothness. If the work has thick details, stacked areas, or uneven relief, the schedule should give the piece enough time to equalize and cool safely through sensitive ranges.
This is especially important if the tack-fused piece will be handled often, hung, shipped, or fired again. A surface that looks beautifully textured can still carry hidden stress if the anneal and cool were too aggressive for the actual thickness.
When in doubt, anneal for the thickest and most complex part of the piece rather than the thinnest-looking area. The raised details are part of the object the kiln has to protect.
Tack fuse preserves texture; annealing protects the textured object.
Studio notes
How to use this in the studio
Use these as practical prompts for a kiln log, a studio conversation, or your next firing test.
- Decide before firing whether you want a light tack, stronger tack, or something closer to contour fuse.
- Check contact areas: raised details need enough glass-to-glass contact to bond reliably.
- Record texture in plain language after firing: sharp, lightly softened, well bonded, over-rounded.
- Anneal for the thickest raised area, not only the base layer.
Source references
Additional resources
One practical firing tip a week
Get a short glass-studio note in your inbox.
No spam — just one useful firing, glass, or studio-practice idea from My Glass Cookbook each week.
Your email is used for MGC studio notes. Read the Privacy Policy.