
Slumping is the kilnforming process where glass softens enough to bend under gravity into or over a mold. The glass is not being asked to become a smooth fused surface. It is being asked to change shape while keeping much of its existing design.
That makes slumping a natural next step after a full fuse, contour fuse, or prepared sheet blank. A flat tile can become a dish. A panel can gain a curve. A fused blank can become functional or sculptural by relaxing into a form.
The schedule for slumping is about restraint. Too little heatwork and the glass may not move fully into the mold. Too much heatwork and the piece can over-slump, distort, mark, stretch, or lose more design detail than intended.
01 / The desired result
Slumping changes shape more than surface.
A slump firing aims to soften glass enough for gravity to shape it. The surface may become slightly glossier or softer, but the main goal is form: a curve, bowl, tray, wave, drape, or other supported shape.
This is different from a full fuse. In a full fuse, the schedule creates bonding and smoothing. In a slump, the glass is usually already a stable sheet or fused blank, and the kiln is asking it to relax into a mold without overworking the surface.
A good slump keeps the design in proportion while giving the piece the intended form. The edge should not stretch or distort more than the design allows. The center should not hang awkwardly above the mold unless that is the desired look.
Before firing, decide what “done” means. Does the blank need to sit fully into the mold? Should it keep a gentle curve? Is a slightly lifted rim acceptable? A clear target shape makes the schedule easier to evaluate.
Slumping is controlled bending, not a second full fuse.
02 / Mold choice
The mold controls how gravity can move the glass.
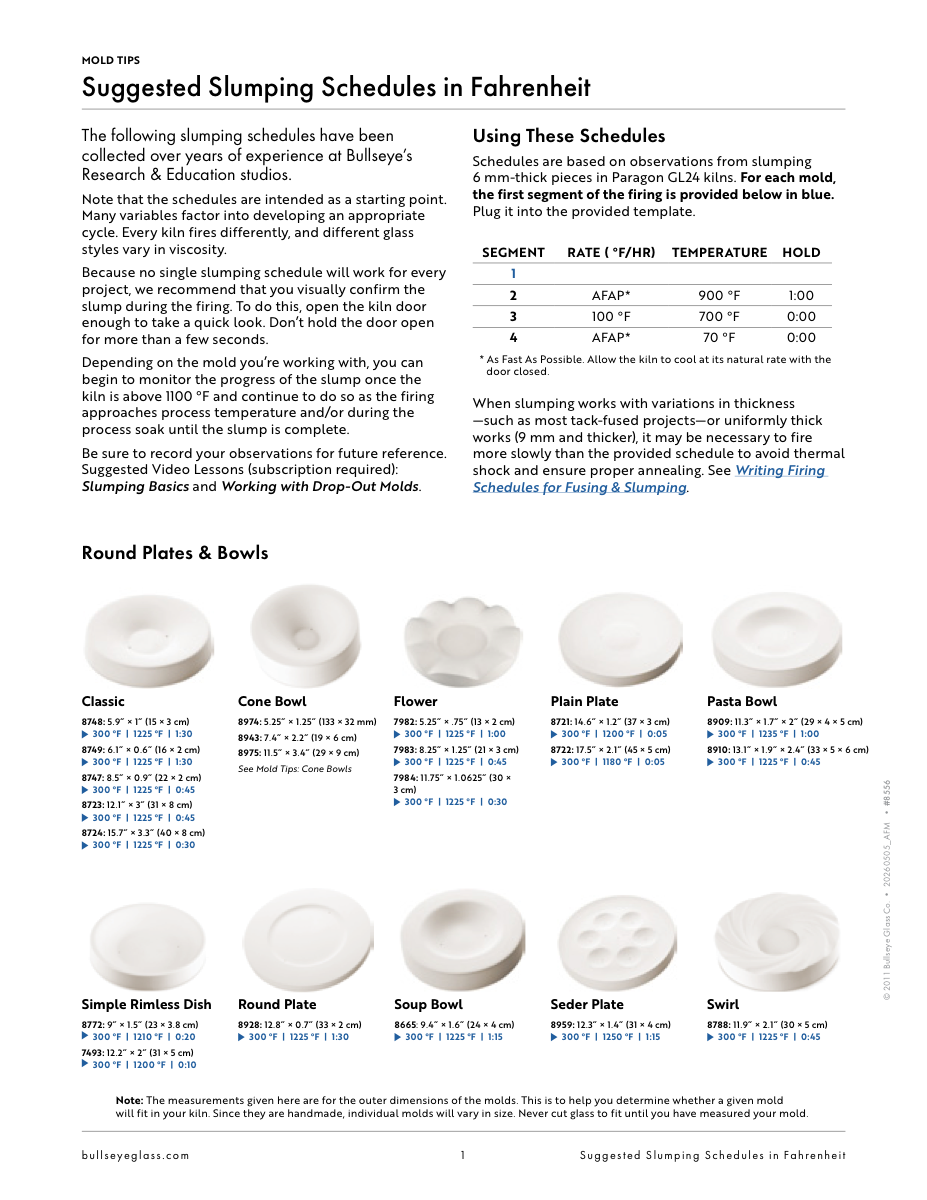
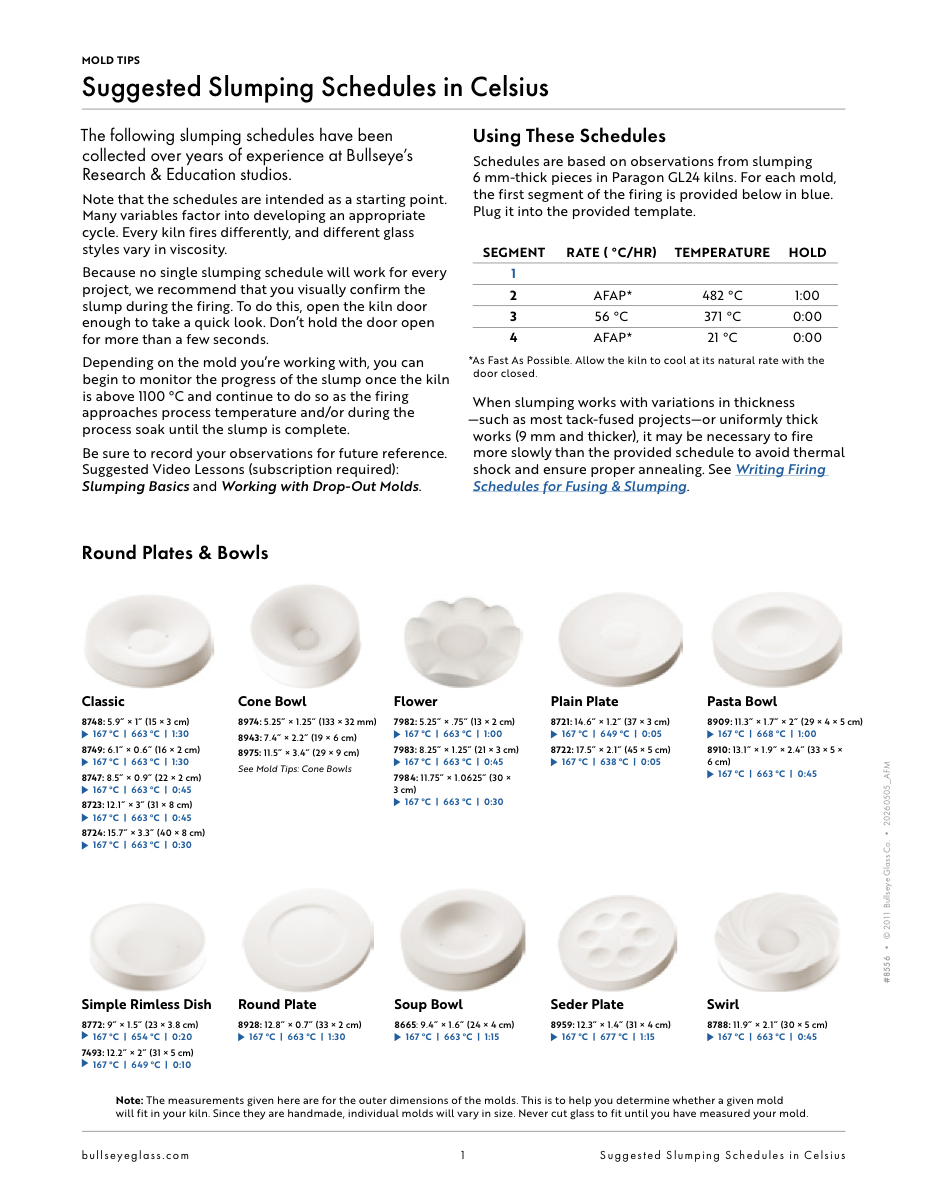
The mold is part of the schedule story. A shallow mold, steep mold, texture mold, drape form, and deep bowl all ask the glass to move differently. The same blank and schedule can behave very differently depending on support, angle, depth, and mold mass.
Molds also absorb and release heat. A heavy ceramic mold may slow the firing response compared with a lighter form. The glass may need enough time to soften and conform, but not so much time that it stretches, thins, or picks up unwanted marks.
Preparation matters. Kiln wash, primer, or release paper must be appropriate for the mold and process. Vent holes and mold shape can affect whether air is trapped under the glass as it settles.
When a slump does not complete evenly, look at the mold as well as the temperature. A corner hanging up, a rim sticking, or a center not dropping may reflect mold geometry, blank size, shelf level, or heat distribution.
In slumping, the mold is not a passive prop; it is the shape-making partner.
03 / Heatwork and timing
The glass needs enough softness, but not too much.
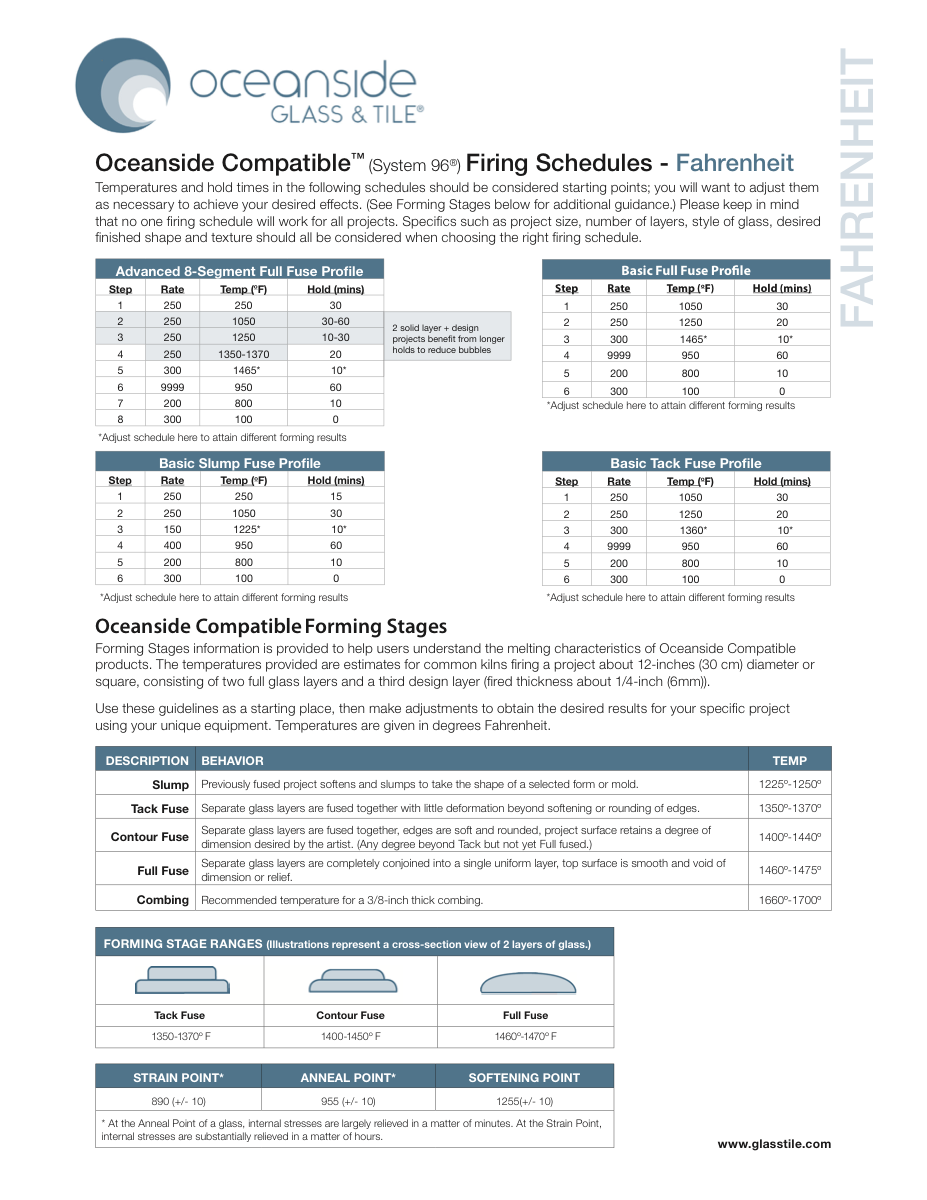
Slumping usually happens at lower temperatures than full fusing, but the exact schedule depends on the glass, thickness, mold, kiln, and desired shape. The goal is to reach the range where the blank can bend without turning the design into a new melted surface.
Hold time can be especially important. A short hold may let the piece begin to move but not fully settle. A longer hold may complete the shape, but it can also allow the glass to over-slump, stretch, or pick up texture from the mold.
The kiln’s view of temperature is not the same as the glass’s visible behavior. A peephole observation, if safe and appropriate for your kiln and studio practice, can teach you when the piece actually starts to move. Many artists learn their slump schedules by correlating written numbers with observed shape.
If the piece under-slumps, you might add a little hold time or adjust the target. If it over-slumps, sticks, distorts, or loses too much surface quality, you may need less heatwork or a different mold/blank relationship.
A slump schedule is successful when the shape arrives before the surface is overworked.
04 / Blank preparation
The flat piece you start with affects the slumped piece you get.
A slumped piece begins before the slump firing. The blank’s thickness, shape, edge finish, fused surface, trapped stress, and design layout all affect how it behaves in the mold.
A blank with uneven thickness may move unevenly. A design with heavy borders may slump differently than an open center. A sharp or coldworked edge may need special attention. A blank that was not annealed well in a previous firing may be vulnerable in the slump firing.
Size also matters. The blank must fit the mold with the right overhang or support for the intended form. Too much overhang can distort. Too little can prevent the glass from reaching the shape. A blank that is not centered can slump unevenly.
Before firing, dry-fit the blank on the mold and look at the path gravity will take. Ask where the glass will touch first, where it will be unsupported, and whether any part is likely to catch, stretch, or trap air.
A good slump starts with a blank that is ready to become that shape.
05 / Annealing the new shape
The shaped piece still has to cool safely.
After the glass has slumped, it must be annealed and cooled for its new form. A curved piece may have uneven thickness, changing support, and stress patterns that differ from the flat blank you loaded into the kiln.
The piece may also remain in contact with a mold that absorbs and releases heat differently than the glass. That relationship can affect cooling, especially for thicker work or deeper forms.
Do not rush the cool simply because the slump happened at a lower temperature than a full fuse. The object still needs time for internal temperature differences to settle and for stress to relax.
For functional work, wall pieces, or pieces that will be handled often, the safe cool is part of the craftsmanship. The shape is only successful if the object survives use, washing, hanging, shipping, and time.
Slumping creates the form; annealing protects the form.
Studio notes
How to use this in the studio
Use these as practical prompts for a kiln log, a studio conversation, or your next firing test.
- Dry-fit the blank on the mold before firing and check overhang, centering, and likely contact points.
- Use enough heatwork to reach the shape, not so much that the surface or edge overworks.
- Record the mold, blank size, shelf position, schedule, and whether the slump was incomplete, right, or too deep.
- Anneal and cool for the shaped object, especially with deep molds or uneven thickness.
Source references
Additional resources
One practical firing tip a week
Get a short glass-studio note in your inbox.
No spam — just one useful firing, glass, or studio-practice idea from My Glass Cookbook each week.
Your email is used for MGC studio notes. Read the Privacy Policy.